5 Simple Custom Design Tips For Clothing and Apparel
Custom design support is the professional assistance you get when creating unique artwork for apparel, promotional products, or marketing materials. Whether you need a logo tweaked, a complete design overhaul, or original artwork created from scratch, the right support can transform your vision into reality.
Most providers offer tiered service levels ranging from basic design upgrades to full custom artwork. Many waive design fees when you meet minimum order thresholds.
Turnaround times vary by complexity but expect 24-48 hours for simple updates and 3-21 days for original artwork. The best providers include unlimited revisions and offer satisfaction guarantees.
The difference between good and great custom design support often comes down to clear communication, fast turnaround, and genuine partnership throughout the creative process.

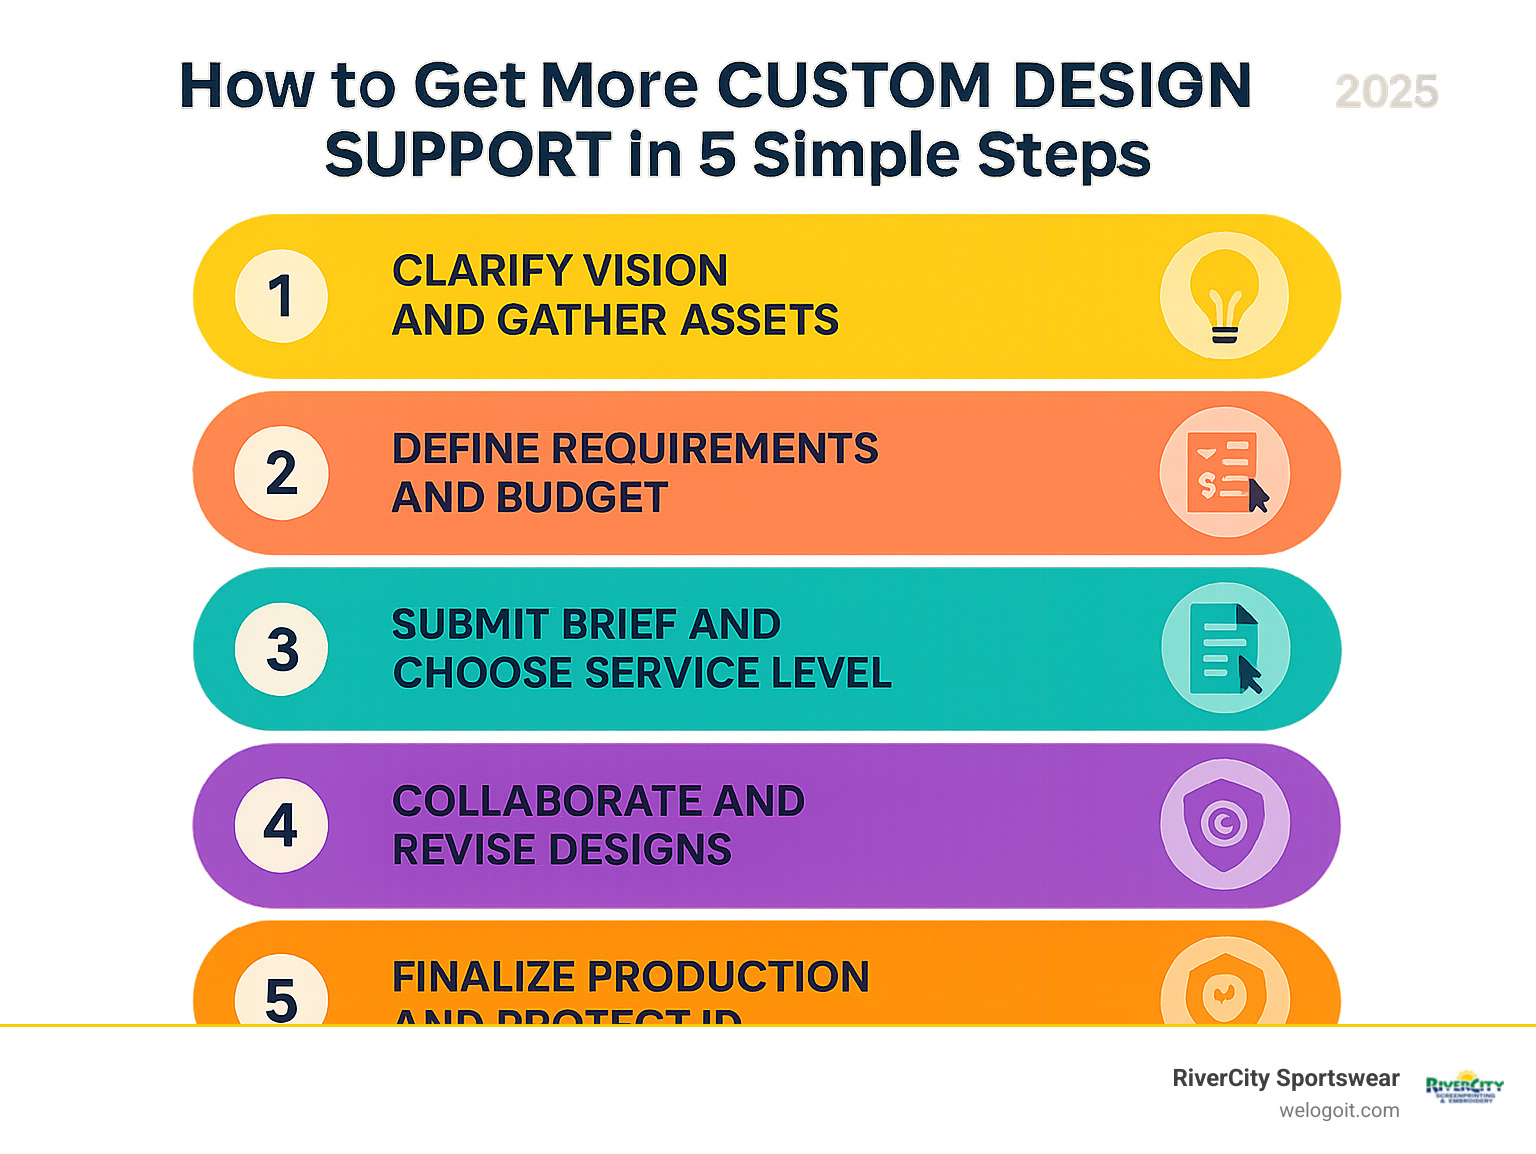
Step 1: Clarify Your Vision & Gather Assets
Think of this first step like planning a road trip – you need to know where you’re going before you can map out the best route. The foundation of exceptional design support starts with crystal-clear communication about your vision, and honestly, this is where most projects either soar or stumble.
Here’s what we’ve learned after helping thousands of clients: those who invest time upfront in gathering assets and clarifying their goals receive better designs faster and with fewer revisions. It’s that simple.
Start by creating a comprehensive vision document that captures your brand guidelines, target audience, and specific use cases for the design. Whether you’re creating custom jerseys for a youth league or promotional t-shirts for a local business, understanding the context helps our designers make smarter creative decisions from day one.
You’ll want to gather your high-resolution logos (vector files work best, but anything over 300 DPI will do), along with your brand color codes – whether that’s Pantone, CMYK, or hex values. Don’t forget any existing artwork that needs modification, reference materials showing styles you love, your text content with exact spelling and formatting, and product specifications like shirt styles, sizes, and colors.
One mistake we see constantly? Clients providing low-resolution images pulled straight from websites. These pixelated files create printing headaches and force unnecessary design delays. If you only have a business card or letterhead, scan it at 600 DPI or higher – your future self will thank you.
Create a Design Inspiration Kit
Building a design inspiration kit is like giving your designer a window into your creative soul. This simple step accelerates the entire process and ensures we’re all rowing in the same direction from the start.
Create a digital folder with 5-10 reference images that capture the mood, style, and aesthetic you’re targeting. Your inspiration kit should include mood board examples showing color combinations and visual styles, competitor designs you admire (but want to stand out from), typography samples if text is involved, Pantone color swatches for precise color matching, and rough sketches of your ideas – even if they’re hand-drawn on a napkin.
Don’t worry about your artistic ability. Stick figures and basic shapes help our designers understand spatial relationships and layout preferences better than you might think. We’ve created amazing designs from smartphone photos of whiteboard brainstorming sessions and sketches that would make a kindergartner proud.
One important note: verify you have permission to use any copyrighted elements. Stock photography, licensed fonts, and trademarked imagery require proper licensing. Our design team can help source appropriate alternatives if needed, so don’t let this step stress you out.
The time you spend clarifying your vision and gathering assets upfront pays dividends throughout the entire custom design support process. Your designer gets a clear roadmap, you get fewer surprises, and everyone stays focused on creating something amazing.
Step 2: Define Your Custom Design Support Requirements
Here’s the thing about custom design support – not every project needs the full treatment. Sometimes you just need a quick logo tweak or color adjustment. Other times, you’re starting from scratch with nothing but a vision and a dream.
After working with thousands of clients, I’ve learned that the biggest frustration comes from mismatched expectations. Someone thinks they need a simple update, but their file is so pixelated we basically have to recreate it from scratch. Or they budget for basic work when what they really want is a complete brand overhaul.
We’ve organized our services into three clear tiers to eliminate confusion. Basic design upgrades handle the everyday stuff – color changes, resizing, file format conversions. These typically run $25-50 and we can knock them out in 24-48 hours.
Full custom design is where things get exciting. This is original artwork created from your concepts, sketches, or detailed descriptions. Budget $175-650 and plan for 3-10 business days, depending on how complex your vision is. We’ve designed everything from intricate team logos to simple but powerful corporate graphics.
Then there’s rush services for those “oh no, the event is next week” moments. We can often deliver custom designs within 24 hours, though it costs extra and limits how many rounds of revisions we can do. Sometimes speed matters more than perfection.
What Counts as Custom Design Support?
Real custom design support isn’t just moving elements around on a template. It’s strategic partnership throughout your creative process. When we take on a custom project, we’re thinking about how your design will look on different shirt colors, how it’ll print with various methods, and whether it matches your brand personality.
True design support means we start with an initial consultation to understand your goals and constraints. We’ll make professional recommendations based on what printing method works best for your timeline and budget. For complex projects, we’ll present multiple concepts so you can see different creative directions.
The best part? Unlimited revision rounds until you’re completely satisfied. We’ve had clients go through fifteen rounds of changes (though most settle on their favorite after two or three). We deliver print-ready files in multiple formats and verify everything aligns with your brand guidelines.
Some providers use collaborative design tools where you can make real-time adjustments. Others prefer structured feedback cycles. We’ve found that scheduled check-ins work best for complex projects, while simple updates flow smoothly through email.
Minimums, Costs & Timelines
Most design support services have minimum order quantities that affect pricing and fee structures. Understanding these requirements upfront prevents those awkward “surprise, there’s an extra fee” conversations.
Here’s what you can typically expect: minimum orders range from 6-100 pieces depending on what you’re ordering.
Rush timelines mean 24-48 hours for simple updates and 3-5 days for original artwork. Standard timelines give you 48 hours to 3 weeks depending on scope. We’ve structured our services to work for both small local orders and large corporate projects.
Production lead times vary significantly based on decoration method, order size, and seasonal demand. Screen printing typically requires 7-14 days after design approval, while embroidery can take 10-21 days for complex designs. We always build in buffer time for unexpected revisions or production hiccups.
The fee waiver thresholds are designed to make professional design support accessible for most budgets. We’d rather create amazing designs and build long-term relationships than nickel-and-dime every small adjustment.
Step 3: Submit a Killer Brief & Choose Your Service Level
Think of your design brief as a conversation starter with your designer. After helping many clients steer through designing, I’ve learned that the best results come from briefs that tell a story rather than just list requirements.
Your brief should paint a picture of what you’re trying to achieve. Instead of saying “I need a logo for a soccer team” try “We’re launching a youth soccer program and need a logo that feels energetic but approachable to both kids and parents.” This context helps our designers understand not just what you want, but why you want it.
The most important questions your brief should answer are pretty straightforward: What are you creating? Who will see it? Where will it be used? When do you need it? And how will it be produced? That last question matters more than you might think – a design that looks great on a business card might not work well embroidered on a polo shirt.
Don’t forget to mention your brand personality. Are you going for professional and trustworthy, or fun and creative? These details make all the difference in the final design. For deeper insights into effective logo design principles, our Simple Guide to Logo Design covers the fundamentals. You can also browse these 63 Water Logo inspiration examples to spark ideas.
Filling Out the Brief
The sweet spot for design briefs is being specific enough to guide your designer without boxing them into a corner creatively. I’ve seen briefs that are so detailed they basically ask for copy-paste work, and others so vague that our designers have to guess what the client wants.
Start with a project overview that explains the purpose in just a few sentences. Then describe your target audience – not just demographics, but how they’ll interact with your design. A logo for a law firm needs to feel different from one for a food truck, even if both serve the same age group.
Your brand voice matters too. Use adjectives that capture the feeling you want: professional, playful, rugged, sophisticated, approachable. These words help designers make hundreds of small decisions about fonts, colors, and layouts.
Be crystal clear about must-have elements like specific logos, text, or colors that need to be included. Just as importantly, mention anything that’s off-limits – competitor colors, overused symbols, or styles that don’t fit your brand.
Technical requirements might seem boring, but they’re crucial. Size constraints, color limitations, and printing methods all affect design choices. A design that works great in full color might fall apart when embroidered in a single thread color.
When it comes to deadlines, honesty works best. Rush projects can turn out great, but they limit how many rounds of revisions we can do together. Give yourself at least 5-7 business days for custom artwork if you want time to refine and perfect the design.
Picking Your Package
Choosing the right level of custom design support is like picking the right tool for the job. You wouldn’t use a sledgehammer to hang a picture frame, and you don’t need a full custom design package to adjust the color of an existing logo.
Our Design Upgrade Package handles the everyday stuff – color adjustments, text changes, format conversion, and cleaning up existing artwork. It’s perfect when you have something that’s almost right but needs a professional touch.
The Full Custom Package is where the magic happens for original artwork. This includes multiple concept presentations, unlimited revisions, and comprehensive file delivery. We’re talking about creating something from scratch based on your ideas, sketches, or detailed descriptions.
Rush Service Options are available when time is tight, but they come with premium pricing. We can often deliver simple updates within 24 hours or custom artwork within 3 days. Expect to pay more for expedited service, and remember that faster timelines mean fewer opportunities for revisions.
Step 4: Collaborate, Revise & Approve Like a Pro
Think of this phase as a creative conversation, not a one-way transaction. Your designer wants to nail your vision, but they need your guidance to get there. The secret is giving feedback that’s specific and actionable rather than vague or subjective.
Instead of saying “make it pop more,” try something like “increase the contrast between the text and background” or “make the logo 20% larger.” This kind of detail helps designers understand exactly what you’re looking for and speeds up the revision process significantly.
The most effective feedback references specific elements by location, explains the reasoning behind changes, and prioritizes requests as must-have versus nice-to-have. If you’re working with a team, consolidate everyone’s input before responding – this prevents conflicting directions and keeps the project moving forward.
Digital mockups are your best friend during this phase. We create realistic previews showing your artwork on the actual products, so you can see exactly how the design will look in real life. This visual approach prevents those “I didn’t expect it to look like that” moments and ensures you’re thrilled with the final result.
Version control becomes crucial when multiple revisions are in play. We label each version clearly and provide approval workflows that make it easy to track changes and sign off on final designs. Our satisfaction guarantee means we’ll keep refining until you’re completely happy with the result.
Fequently Asked Questions about Custom Designs
Custom design support often raises questions about ownership, usage rights, and revision policies. Here are the most common concerns we address with clients:
What if I don’t love the first draft?
Don’t worry – this is completely normal and expected. Most reputable providers offer unlimited revision rounds until you’re completely satisfied, and we’re no exception.
The key is providing constructive, specific feedback that helps designers understand your preferences. We typically see 2-3 revision cycles for most projects. Simple adjustments like color changes or text modifications can be completed within hours, while significant layout changes may require 24-48 hours.
Unlimited revisions apply to refinements of the original concept, not complete design overhauls. If you want to explore entirely different creative directions after seeing the first draft, that may require additional design fees – but we’ll discuss this upfront so there are no surprises.
Can I print the art elsewhere?
This depends on your provider’s licensing policy, and it’s worth asking about before you start. Many companies restrict artwork usage to their own production services, while others provide full ownership rights with your purchase.
At RiverCity, we believe you should own your custom artwork. Once you’ve paid for design services, you receive print-ready files that you can use anywhere. However, we’re confident in our production quality and customer service – most clients choose to continue working with us for future orders.
Always clarify usage rights before starting your project. The licensing terms should be clearly spelled out, and you should receive your files in multiple formats suitable for different printing methods.
How many revisions are typical?
Most projects require 2-3 revision cycles to reach final approval. Simple projects like logo adjustments might need only one revision, while complex custom artwork could require 4-5 rounds of feedback.
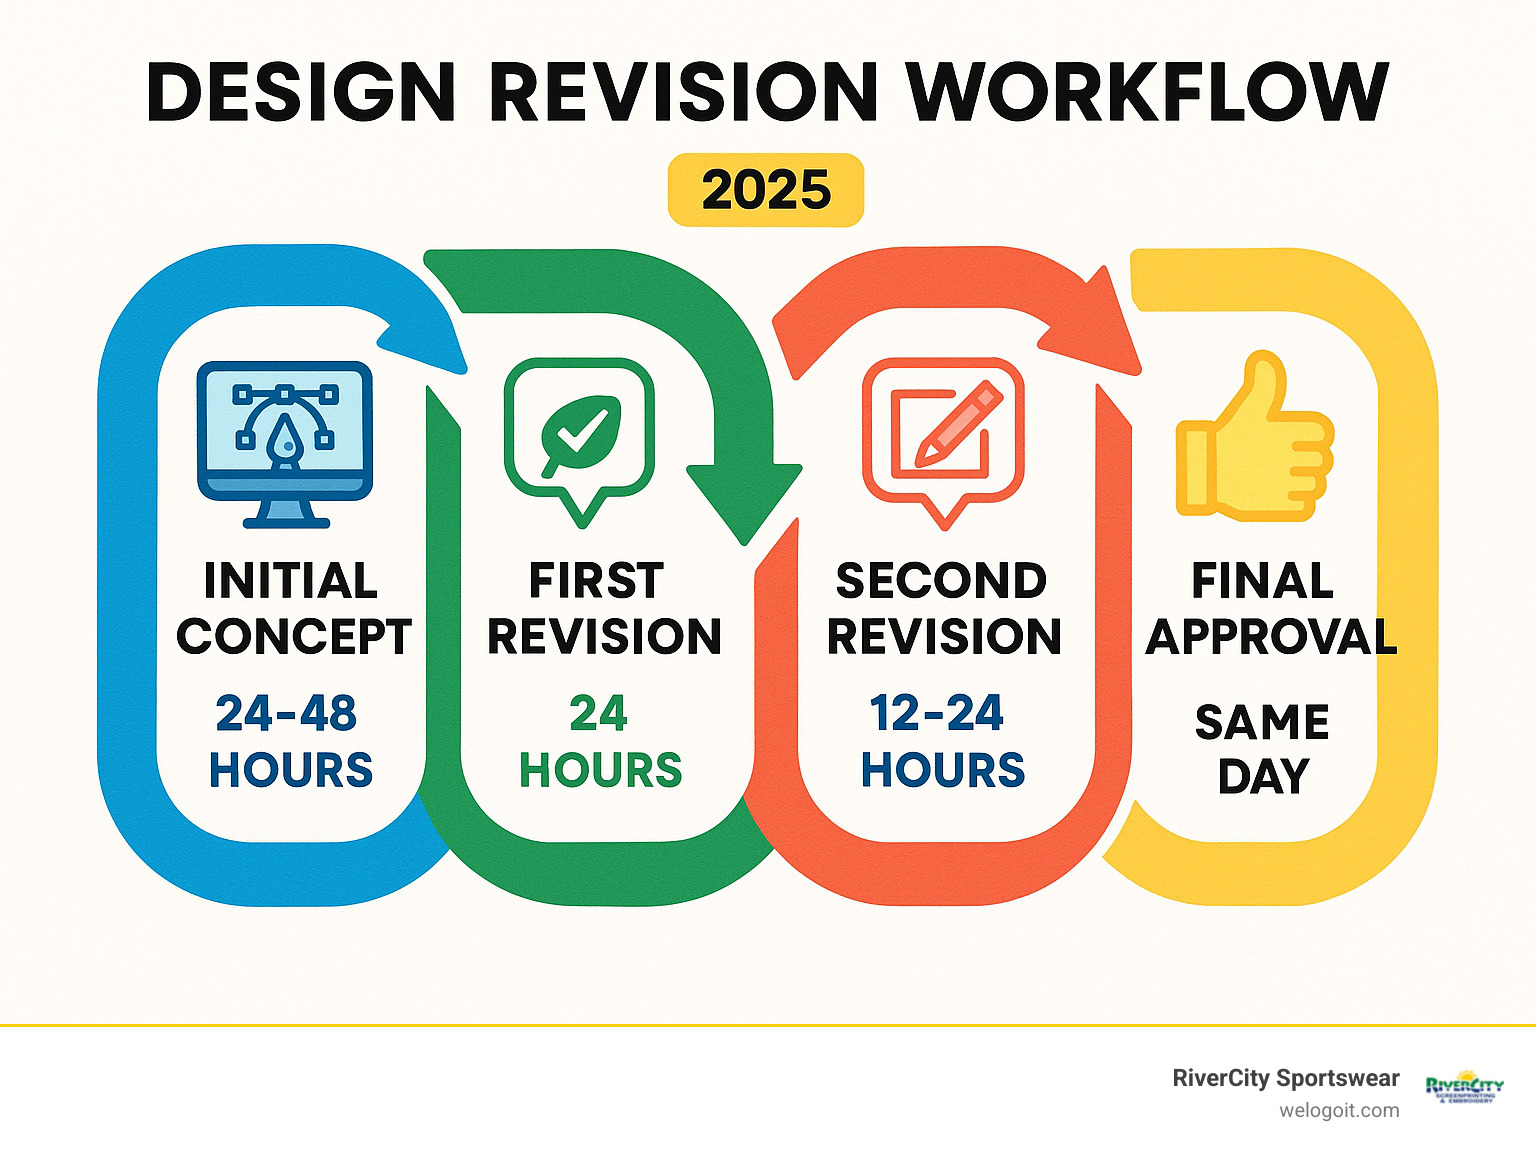
Our typical revision timeline starts with initial concepts delivered 24-48 hours after brief submission. First revisions come back within 24 hours of your feedback, second revisions within 12-24 hours, and final approvals often happen the same day for minor adjustments.
Milestone sign-offs help manage expectations and prevent scope creep. We recommend formal approval at key stages: initial concept, major revisions, and final artwork. This creates clear decision points and maintains project momentum without endless tweaking.

Step 5: Finalize Production, Protect Your IP & Scale Your Custom Design Support
You’re almost at the finish line! This final step is where everything comes together – from production oversight to protecting your creative investment and setting yourself up for future success.
Once you’ve given that final thumbs-up to your artwork, don’t just sit back and wait. This is the perfect time to request all the file formats you might ever need. Ask for vector files (AI, EPS) that can scale to any size without getting pixelated, high-resolution rasters (PNG, JPEG) for your website and social media, and print-ready PDFs for production. Trust me, having these formats now saves you from scrambling later when you need your logo for a trade show banner or business cards.
Here’s where quality control becomes your best friend. Always request a physical sample or detailed production proof before your full order rolls off the press. I’ve seen too many clients get excited about digital mockups only to be disappointed when the actual product doesn’t match their expectations. Colors can shift, sizes can be off, and placement might not look quite right on the real thing.
Your pre-production checklist should cover artwork approval from everyone who needs to sign off, color matching with those specific Pantone references we talked about earlier, size and placement verification on actual products, text accuracy (because typos happen to the best of us), and production timeline confirmation that aligns with your delivery needs.
For even more design wisdom, check out our Design Tips to Keep in Mind Before Printing T-Shirts and explore our More info about custom clothing services.
Intellectual property protection might sound fancy, but it’s really just about making sure your creative investment stays yours. If you’ve created a logo or design that’s going to be central to your brand, consider trademark registration. Even if you skip the formal paperwork, document your design creation process and keep those original artwork files safe. You never know when you might need to prove ownership.
Think about your reorder strategy from day one. Many successful promotional campaigns need multiple production runs – maybe you’ll want seasonal variations or find you need more sizes. Building a relationship with a reliable provider who keeps your artwork files organized makes future orders a breeze and ensures consistency across all your campaigns.
Maintaining Custom Design Support After Delivery
Smart businesses maintain comprehensive asset libraries with all approved artwork in multiple formats, ready for whatever comes next. They document their brand guidelines including those precise color codes, approved fonts, and usage rules that keep everything looking professional. They plan seasonal updates for recurring campaigns and establish clear approval workflows for future modifications. Most importantly, they track ROI metrics to prove their design investment is paying off and guide future decisions.
At RCSE, we act as your artwork’s digital filing cabinet, keeping everything organized and accessible. Whether you need your logo tweaked for a new product line or want to create matching designs for your annual company event, having those files ready to go means faster turnaround and lower costs.
Consider setting up annual design support contracts for ongoing needs. Many of our clients love having monthly design hours banked that they can use throughout the year. It’s like having a designer on retainer – you get cost predictability and immediate access to professional help when opportunities pop up.
Regular design audits keep your brand looking sharp as you grow. Take a quarterly look at all your customer-facing materials to make sure logos, colors, and messaging still align with your brand guidelines. It’s like a health checkup for your brand – catching small issues before they become big problems.

Your design journey doesn’t end with delivery – it’s just getting started. With the right partner and a solid plan, your logo will keep working for your business for years to come.
Table of Contents
